前回、CentOS 8をインストールしましたので、私が普段インストール後に最低限実施している項目の備忘録です。
システムによってセキュリティ要件は様々ですが、私が扱うシステムは外部ネットワークに接続されていないことが多いです。
そのため、セキュリティ設定は無効化にしています。
そのため、同様の環境や検証環境での方法として参考にしていただければと思います。
1.インストール確認
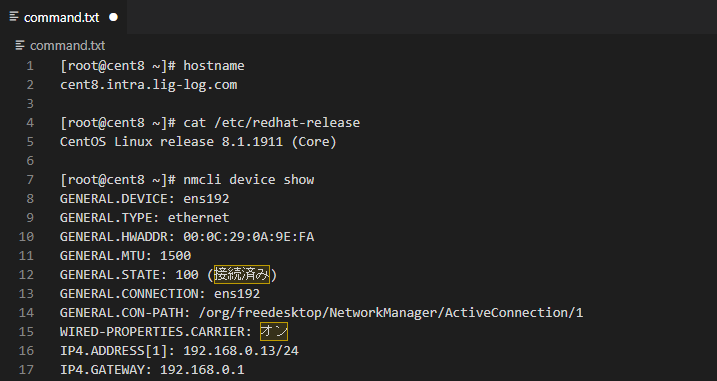
まず、インストール時に設定した内容が正しいことを確認します。
最低限、下記の設定を確認しましょう。
- ホスト名
- OSバージョン
- ネットワーク
- ディスク
[root@cent8 ~]# hostname
cent8.intra.lig-log.com
[root@cent8 ~]# cat /etc/redhat-release
CentOS Linux release 8.1.1911 (Core)
[root@cent8 ~]# nmcli device show
GENERAL.DEVICE: ens192
GENERAL.TYPE: ethernet
GENERAL.HWADDR: 00:0C:29:0A:9E:FA
GENERAL.MTU: 1500
GENERAL.STATE: 100 (接続済み)
GENERAL.CONNECTION: ens192
GENERAL.CON-PATH: /org/freedesktop/NetworkManager/ActiveConnection/1
WIRED-PROPERTIES.CARRIER: オン
IP4.ADDRESS[1]: 192.168.0.13/24
IP4.GATEWAY: 192.168.0.1
IP4.ROUTE[1]: dst = 192.168.0.0/24, nh = 0.0.0.0, mt = 100
IP4.ROUTE[2]: dst = 0.0.0.0/0, nh = 192.168.0.1, mt = 100
IP4.DNS[1]: 192.168.0.11
IP4.DNS[2]: 192.168.0.1
IP6.ADDRESS[1]: fe80::cc14:8e59:e285:a19f/64
IP6.GATEWAY: —
IP6.ROUTE[1]: dst = fe80::/64, nh = ::, mt = 100
IP6.ROUTE[2]: dst = ff00::/8, nh = ::, mt = 256, table=255
[root@cent8 ~]# fdisk -l /dev/sda
ディスク /dev/sda: 50 GiB, 53687091200 バイト, 104857600 セクタ
単位: セクタ (1 * 512 = 512 バイト)
セクタサイズ (論理 / 物理): 512 バイト / 512 バイト
I/O サイズ (最小 / 推奨): 512 バイト / 512 バイト
ディスクラベルのタイプ: gpt
ディスク識別子: FE75A5FD-7D9C-4DAD-A566-67BDF95A18B4
デバイス 開始位置 終了位置 セクタ サイズ タイプ
/dev/sda1 2048 411647 409600 200M EFI システム
/dev/sda2 411648 2508799 2097152 1G Linux ファイルシステム
/dev/sda3 2508800 104855551 102346752 48.8G Linux LVM
[root@cent8 ~]# df -hT
ファイルシス タイプ サイズ 使用 残り 使用% マウント位置
devtmpfs devtmpfs 1.9G 0 1.9G 0% /dev
tmpfs tmpfs 1.9G 0 1.9G 0% /dev/shm
tmpfs tmpfs 1.9G 8.7M 1.9G 1% /run
tmpfs tmpfs 1.9G 0 1.9G 0% /sys/fs/cgroup
/dev/mapper/cl-root xfs 37G 1.6G 36G 5% /
/dev/mapper/cl-var_log xfs 10G 109M 9.9G 2% /var/log
/dev/sda2 ext4 976M 130M 780M 15% /boot
/dev/sda1 vfat 200M 6.8M 194M 4% /boot/efi
tmpfs tmpfs 379M 0 379M 0% /run/user/0
2.セキュリティ設定
2.1.SELinux無効化
SELinuxとは、カーネルの制御機能の1つです。
下記のコマンドで「SELINUX」を「disabled」に設定します。
SELinuxの設定を反映するためには、OSを再起動する必要があります。
[root@cent8 ~]# vi /etc/selinux/config
# This file controls the state of SELinux on the system.
# SELINUX= can take one of these three values:
# enforcing – SELinux security policy is enforced.
# permissive – SELinux prints warnings instead of enforcing.
# disabled – No SELinux policy is loaded.
SELINUX=disabled
# SELINUXTYPE= can take one of these three values:
# targeted – Targeted processes are protected,
# minimum – Modification of targeted policy. Only selected processes are protected.
# mls – Multi Level Security protection.
SELINUXTYPE=targeted
OS再起動後、下記のコマンドでSELinuxが無効化されていることを確認します。
[root@cent8 ~]# getenforce
Disabled
2.2.firewalld無効化
firewalldは、CentOS 7から導入されたファイアウォール機能です。
CentOS 6まではiptablesが使われていました。
下記のコマンドで firewalld サービスを停止します。
[root@cent8 ~]# systemctl stop firewalld
firewalldが停止したことを確認します。
[root@cent8 ~]# systemctl status firewalld
● firewalld.service – firewalld – dynamic firewall daemon
Loaded: loaded (/usr/lib/systemd/system/firewalld.service; enabled; vendor preset: enabled)
Active: inactive (dead) since Sat 2020-04-18 01:22:26 EDT; 1s ago
Docs: man:firewalld(1)
Process: 1193 ExecStart=/usr/sbin/firewalld –nofork –nopid $FIREWALLD_ARGS (code=exited, status=0/SUCCESS)
Main PID: 1193 (code=exited, status=0/SUCCESS)
4月 04 02:55:00 cent8.intra.lig-log.com systemd[1]: Starting firewalld – dynamic firewall daemon…
4月 04 02:55:02 cent8.intra.lig-log.com systemd[1]: Started firewalld – dynamic firewall daemon.
4月 18 01:22:23 cent8.intra.lig-log.com systemd[1]: Stopping firewalld – dynamic firewall daemon…
4月 18 01:22:26 cent8.intra.lig-log.com systemd[1]: Stopped firewalld – dynamic firewall daemon.
firewalldの自動起動を無効化します。
[root@cent8 ~]# systemctl disable firewalld
Removed /etc/systemd/system/multi-user.target.wants/firewalld.service.
Removed /etc/systemd/system/dbus-org.fedoraproject.FirewallD1.service.
自動起動が無効化されたことを確認します。
[root@cent8 ~]# systemctl is-enabled firewalld
disabled
3.Bashコマンドの補完
デフォルトではサービスコマンドのsystemctlを補完出来ないため、「bash-completion」をインストールします。
これでsystemctlコマンドの補完も可能になります。
[root@cent8 ~]# yum install bash-completion
4.時刻同期
時刻同期をするためには chronydを利用します。
chronydはCentOS 7からデフォルトのNTPサーバー/クライアントです。
下記のコマンドでNTPサーバーを指定します。
デフォルト設定がある場合はコメントアウトします。
server <NTPサーバー> iburst
※ibrust:初回同期の時間を短縮する
[root@cent8 ~]# vi /etc/chrony.conf
# Use public servers from the pool.ntp.org project.
# Please consider joining the pool (http://www.pool.ntp.org/join.html).
#pool 2.centos.pool.ntp.org iburst
server ntp.nict.jp iburst
設定が完了したらサービスを起動します。
[root@cent8 ~]# systemctl start chronyd
下記のコマンドで時刻同期の状態を確認します。
IPアドレスの左に「*」が表示されれば、正常に時刻同期されています。
[root@cent8 ~]# chronyc sources
210 Number of sources = 1
MS Name/IP address Stratum Poll Reach LastRx Last sample
==============================================
^* 61.205.120.130 1 6 377 36 -308us[ -656us] +/- 8181us
5.システムアップデート
4.1.OSバージョン除外設定
初期設定のままアップデートをすると、OSのバージョンまでアップデートされてしまいます。
OSバージョンを保持したままアップデートするためには、「kernel」と「centos」をアップデートの対象外に指定する必要があります。
下記のコマンドで除外設定を実施します。
[root@cent8 ~]# vi /etc/yum.conf
exclude=kernel*,centos-release*
4.2.アップデート
それでは実際にアップデートを開始します。アップデート後はOSを再起動します。
[root@cent8 ~]# yum update
CentOSの初期設定手順については以上です。
コメント