共有メールボックスの作成やメンバー追加をPowerShellで出来るようにしておくと便利です。
また、共有メールボックスに必要な設定をスクリプト化しておくと運用の自動化も可能です。
今回はExchange Onlineの共有メールボックスをPowerShellで作成する方法を紹介します。
1.共有メールボックス作成
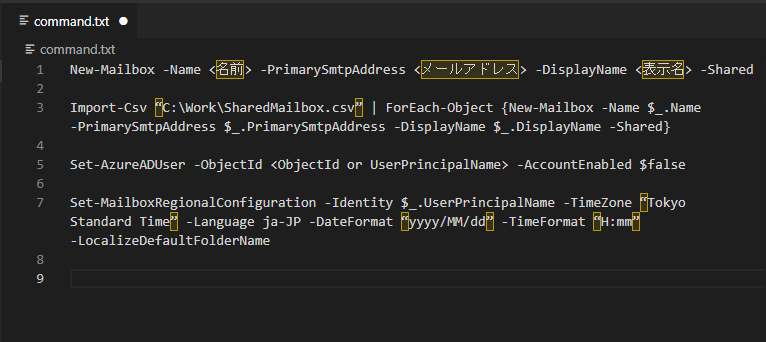
共有メールボックスを作成するには下記のコマンドを実行します。
New-Mailbox -Name <名前> -PrimarySmtpAddress <メールアドレス> -DisplayName <表示名> -Shared
一括で作成するには下記のコマンドを実行します。
Import-Csv “C:\Work\SharedMailbox.csv” | ForEach-Object {New-Mailbox -Name $_.Name -PrimarySmtpAddress $_.PrimarySmtpAddress -DisplayName $_.DisplayName -Shared}
<CSVファイル例>
| Name | DisplayName | PrimarySmtpAddress |
|---|---|---|
| test001 | テスト001 | test001@test.com |
| test002 | テスト002 | test002@test.com |
| test003 | テスト003 | test003@test.com |
共有メールボックスをPowerShellで確認する方法は下記をご参照ください。
Exchange OnlineのメールボックスをPowerShellで取得する
2.メンバー追加
共有メールボックスを作成するには下記のコマンドを実行します。
Import-CSV “C:\Work\PermissionList.csv” | ForEach-Object {Add-MailboxPermission -Identity $_.UserPrincipalName -User $_.User -AccessRights FullAccess -Confirm:$False;Add-RecipientPermission -Identity $_.UserPrincipalName -Trustee $_.User -AccessRights SendAs -Confirm: $False}
<CSVファイル例>
| UserPrincipalName(共有メールボックス) | User(ユーザー) |
|---|---|
| test001@test.com | user001@test.com |
| test002@test.com | user002@test.com |
| test003@test.com | user003@test.com |
設定を確認するには下記のコマンドを実行します。
Import-CSV “C:\Work\PermissionList.csv” | ForEach-Object {Get-MailboxPermission -Identity $_.UserPrincipalName} | Export-Csv C:\Work\MailPermission.csv -Encoding default -NoTypeInformation
Import-CSV “C:\Work\PermissionList.csv” | ForEach-Object {Get-RecipientPermission -Identity $_.UserPrincipalName} | Export-Csv C:\Work\RecipientPermission.csv -Encoding default -NoTypeInformation
3.ログイン禁止設定
共有メールボックスのパスワードは、共有メールボックス作成時にシステムで自動生成されます。
共有メールボックスにログインする必要はないので、パスワード漏洩に備えてログインを禁止しておく方が望ましいです。
共有メールボックスへのログインを禁止するには下記のコマンドを実行します。
※「ObjectId」オプションで指定する値はUPNでも問題ありません
Set-AzureADUser -ObjectId <ObjectId or UserPrincipalName> -AccountEnabled $false
一括で設定するには下記のコマンドを実行します。
Import-Csv “C:\Work\UserPrincipalName.csv” | ForEach-Object {Set-AzureADUser -ObjectId $_.UserPrincipalName -AccountEnabled $false}
設定を確認するには下記のコマンドを実行します。
Import-Csv “C:\Work\ObjectList.csv” | ForEach-Object {Get-AzureADUser -ObjectId $_.ObjectId} | Select-Object AccountEnabled
4.言語・タイムゾーン設定
共有メールボックスの言語やタイムゾーンを設定するには下記のコマンドを実行します。
Set-MailboxRegionalConfiguration -Identity $_.UserPrincipalName -TimeZone “Tokyo Standard Time” -Language ja-JP -DateFormat “yyyy/MM/dd” -TimeFormat “H:mm” -LocalizeDefaultFolderName
一括で設定するには下記のコマンドを実行します。
Import-Csv “C:\Work\UserPrincipalName.csv” | ForEach-Object {Set-MailboxRegionalConfiguration -Identity $_.UserPrincipalName -TimeZone “Tokyo Standard Time” -Language ja-JP -DateFormat “yyyy/MM/dd” -TimeFormat “H:mm” -LocalizeDefaultFolderName}
設定を確認するには下記のコマンドを実行します。
Import-Csv “C:\Work\UserPrincipalName.csv” | ForEach-Object {Get-MailboxRegionalConfiguration -Identity $_.UserPrincipalName} | select-object Identity,Language,DateFormat,TimeFormat,TimeZone
PowerShellで共有メールボックスを作成する方法については以上です。
コメント